

Why You Should Enable Windows File History Before It’s Too Late
Enabling Windows File History takes less than two minutes — and it could save you hours of heartbreak when a file disappears.
Here’s how to turn it on right now:
- Plug in an external USB drive or connect to a network location
- Open the Control Panel (search for it in the Start menu)
- Go to System and Security > File History
- Click “Turn on”
That’s it. Windows will start backing up your files automatically.
Accidents happen. You delete a document you needed. A file gets corrupted. You save over something you shouldn’t have. Without a backup system running in the background, those files are gone for good.
Windows File History is a built-in feature — available in Windows 10 and Windows 11 — that quietly works in the background. It monitors your key folders like Documents, Pictures, Desktop, and Videos, and saves copies to an external drive every hour by default. If something goes wrong, you can roll back to an earlier version in seconds.
It’s been part of Windows since Windows 8, yet most people never turn it on. And it’s off by default.

I’m Faisal S. Chughtai, founder of ActiveX and a Microsoft Azure and Windows systems specialist with years of hands-on experience helping users and businesses configure reliable backup strategies — including how to enable Windows File History across home and enterprise setups. In the sections below, I’ll walk you through everything you need to get it working properly.
What is Windows File History and How Does it Work?
At its core, Windows File History is an automated, local backup solution designed for your personal data. Unlike a “System Image” backup, which takes a massive snapshot of your entire operating system, programs, and settings, File History focuses exclusively on the files you create and care about.
Incremental Snapshots and the NTFS Change Journal
How does it know which files to back up without slowing down your computer? We can thank the NTFS change journal. This is a hidden log within the Windows file system that tracks every modification made to a file. Instead of scanning every single folder on your drive every few minutes, File History simply checks this journal to see what has changed since the last run.
When it detects a change, it creates an incremental snapshot. This means it only copies the updated version of the file, not the entire folder. Over time, this creates a timeline of your work. If you were working on a presentation at 10:00 AM and accidentally deleted half the slides at 11:00 AM, you can go back to the 10:00 AM version and breathe a sigh of relief.
What it Backs Up
By default, File History targets your “Libraries.” In Windows terminology, this includes:
- Documents
- Music
- Pictures
- Videos
- Desktop
- Offline OneDrive files (files synced to your local machine)
It’s important to note that File History does not back up your Windows system files or your installed applications. For more on the official Microsoft stance on these mechanics, you can check out File History Managing data backups is a key responsibility of your IT team. When users accidentally delete files or experience system failures, having a recovery plan in place can save time and resources.If your infrastructure runs on Windows operating systems, you can use File History to automatically save back….
Hardware Requirements
To enable Windows File History, you need a dedicated place to store those copies. We generally recommend an external USB hard drive or an SSD with at least 100GB of space. Alternatively, you can use network-attached storage (NAS) if you have a home server or a shared folder on another PC. You cannot use the same drive that Windows is installed on; this is a safety measure to ensure that if your main drive dies, your backups are still safe.
Step-by-Step Guide to Enable Windows File History
Ready to set up your safety net? We’ve broken this down into the most common methods for both Windows 10 and Windows 11. Before you start, make sure your external drive is plugged in and recognized by your computer. If you find your folders are acting sluggish during this process, you might want to Repair Your Broken Windows File Explorer in Minutes to ensure a smooth setup.
How to Enable Windows File History in Windows 10
Windows 10 offers two ways to do this, but the “Settings” app is the most modern approach:
- Click the Start button and select the Settings (gear) icon.
- Navigate to Update & Security > Backup.
- Under the Back up using File History section, click the “+” icon next to Add a drive.
- Windows will search for connected external drives. Select the drive you want to use.
- Once selected, the toggle for Automatically back up my files will switch to On.
If you prefer the old-school way, you can also search for “File History” in the taskbar and open the Control Panel version, which gives you a bit more granular control over “clean up” options later on.
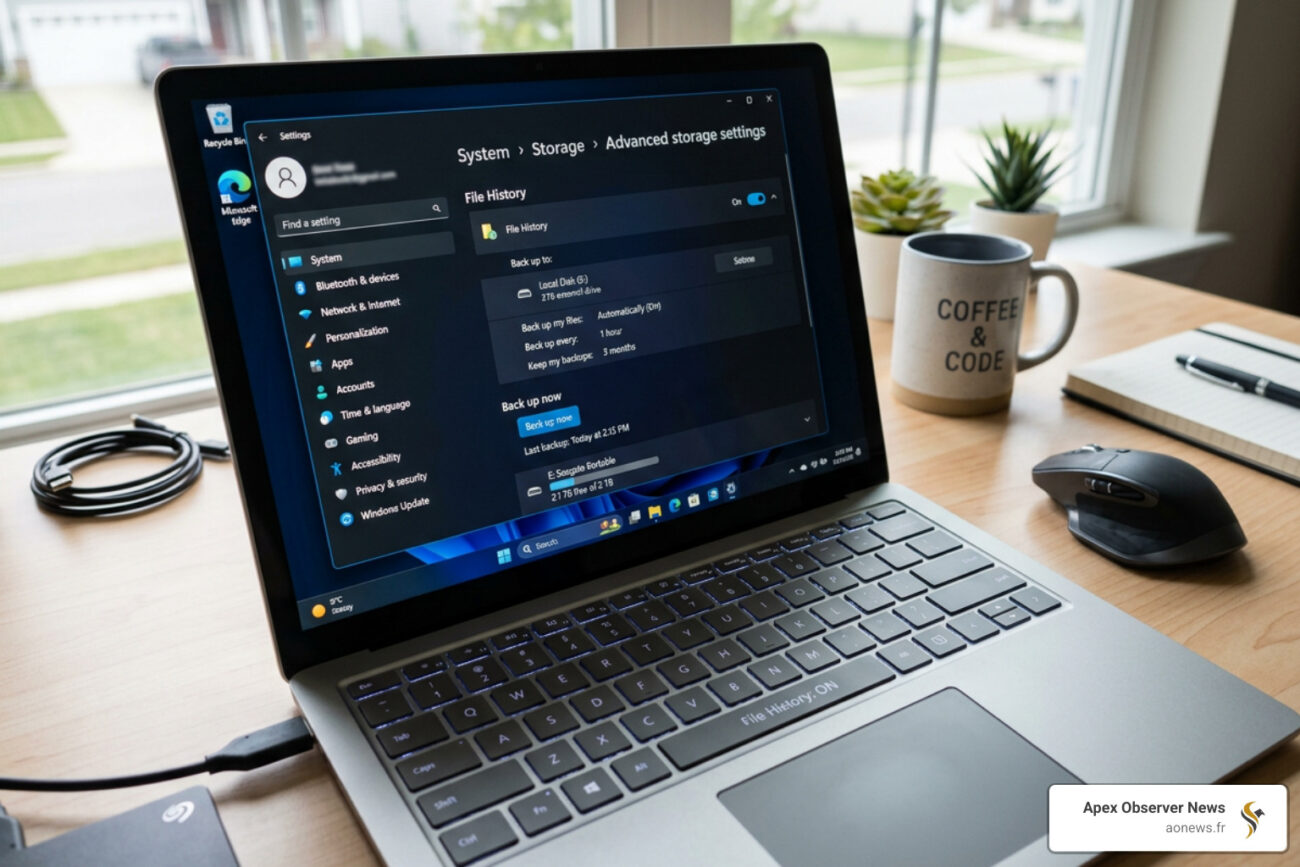
How to Enable Windows File History in Windows 11
In Windows 11, Microsoft has slightly “hidden” File History in favor of OneDrive cloud backups. However, it is still fully supported and very much alive in the Control Panel.
- Click the Search icon (or press Win + S) and type Control Panel.
- Set the “View by” option in the top right to Large icons.
- Find and click on File History.
- If your drive is connected, you should see it listed. If not, click Select drive on the left-hand menu to choose your backup destination.
- Click the Turn on button.
We’ve noticed that some Windows 11 users find the transition to the new UI confusing, especially when legacy features like this are tucked away. If you’re having trouble with other Windows 11 features, like your internet connection, check out our guide on what to do if there is No Wi-Fi Option in Windows 11? Here’s How to Restore It.
Configuring Backup Frequency and Folder Exclusions
Simply turning it on is a great first step, but we want to make sure it works exactly how you need it to. You don’t want your backup drive filling up with useless temporary files, and you might want more frequent backups for that novel you’re writing.
Polling Intervals and Backup Frequency
By default, Windows saves a copy of your files every hour. However, if you are working on high-stakes projects, you can increase this frequency.
- 10 Minutes: Ideal for active document editing.
- Daily: Sufficient for photos or files that don’t change often.
To change this, go to Advanced settings (in the Control Panel) or More options (in Windows 10 Settings). Look for the dropdown menu labeled Save copies of files.
Retention Policies: How Long to Keep Backups?
You also need to decide how long Windows should keep those old versions.
- Forever (Default): This will eventually fill up your drive.
- Until space is needed: This is our recommended setting. Windows will keep as many versions as possible and only delete the oldest ones when the backup drive gets full.
- 1 month to 2 years: Good if you want to keep your backup drive lean.
Excluding Folders
Not everything in your “Documents” folder needs a backup. Maybe you have a folder full of massive video game recordings or temporary downloads.
- In the File History window, click Exclude folders.
- Click Add and browse to the folder you want to skip.
- Click Save changes.
If your system starts acting up while you’re digging through these deep settings, don’t panic. It’s common for the interface to hang if you have thousands of files. You can learn How to Fix a Crashing File Explorer Without Losing Your Mind to keep your configuration session on track.
How to Restore Files and Troubleshoot Common Issues
The true value of enabling Windows File History is revealed the moment you realize a file is missing. The restoration process is incredibly intuitive once you know where to look.
The Restore Process
- Open File Explorer and navigate to the folder where the file used to be.
- Right-click any empty space in the folder (or right-click a specific file you want to revert).
- Select Restore previous versions. (In Windows 11, you may need to click “Show more options” first).
- A window will pop up showing a list of dates and times. Select the version you want.
- You can click Open to preview the file to make sure it’s the right one, or click Restore to put it back in its original place.
Pro-tip: If you click the arrow next to the Restore button, you can choose Restore to and pick a different location. This is great if you want to compare the old version with your current one without overwriting it.
Troubleshooting Common Issues
Drive Not Recognized
If Windows says “No File History drive found,” first check the physical connection. If it’s a network drive, ensure your Wi-Fi or Ethernet is active. Sometimes, Windows loses the “link” to the drive if the drive letter changes (e.g., from D: to E:). You can fix this by going back to “Select drive” and re-selecting it.
BitLocker To Go
If you use BitLocker to encrypt your main C: drive, we highly recommend you also enable BitLocker To Go on your external backup drive. If your primary drive is encrypted but your backup isn’t, your data isn’t truly secure. However, keep in mind that you must unlock the external drive before File History can run its scheduled backup.
Path Length Limitations
This is a technical “gotcha” that many users miss. Windows has a maximum file path length (usually around 260 characters). File History adds its own timestamp to the end of your file names in the backup (e.g., MyReport (2023_10_27 12_00_00 UTC).docx). If your original file path is already very long (around 185 characters or more), the added timestamp might push it over the limit, causing the backup to fail for that specific file. Keep your folder structures organized and avoid nesting folders ten levels deep!
Frequently Asked Questions about Windows File History
What folders does File History back up by default?
By default, it covers your user account’s “Libraries.” This includes Documents, Music, Pictures, Videos, and the Desktop folder. It also includes your “Favorites” (from Internet Explorer/Edge) and your Contacts. If you want to back up a folder that isn’t in this list, the easiest way is to right-click that folder and select Include in library.
Can I use File History with a cloud drive or internal partition?
Technically, File History requires an external drive or a network location. You cannot easily back up to a different folder on the same physical hard drive where Windows lives. While you can’t “select” OneDrive as a File History destination directly, you can use a network share or a NAS. If you’re looking for cloud-specific options, Microsoft’s “Windows Backup” app (integrated with OneDrive) is the modern alternative, though it doesn’t offer the same local versioning control as File History.
Is File History still supported in Windows 11?
Yes, but with a caveat. Microsoft is clearly pushing users toward OneDrive for file backups. In Windows 11, the File History toggle was removed from the main Settings app and moved back into the Control Panel. It still works perfectly, but you have to go looking for it. For those who prefer local control over their data without paying for cloud subscriptions, File History remains the best built-in tool.
Conclusion
We live in a digital age where our memories, work, and finances are stored in bits and bytes. Enabling Windows File History is one of the simplest and most effective ways to protect yourself from the inevitable “oops” moments of computing.
At Apex Observer News, we believe in a layered backup strategy. File History is your “short-term” safety net for daily changes. Combine it with a cloud service like OneDrive for off-site protection and an occasional full system image backup for total disaster recovery.
By following this guide, you’ve taken a massive step toward data redundancy. Don’t wait until you’re staring at an empty folder to wish you had turned this on. Plug in that spare drive, follow the steps, and sleep a little easier tonight knowing your files are safe. For more tips on keeping your system running smoothly, stay updated on Windows 11 features and other tech news with us!