

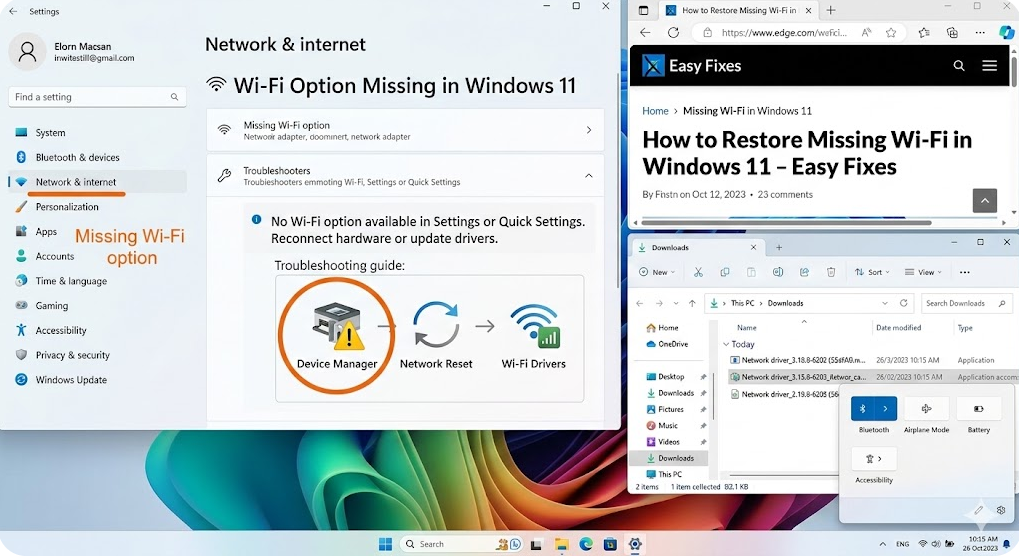
Did you just power on your computer only to find the Wi-Fi option missing? It’s a frustrating and confusing problem. The good news is that it usually comes down to an underlying issue with Windows, your network settings, or the hardware itself. Here’s how to identify the root cause and restore the missing Wi-Fi option.
Check That the Airplane Mode Is Off
Enabling Airplane Mode in Windows completely turns off all wireless connections, which can make it appear as if the Wi-Fi option has disappeared. This mode helps avoid interruptions or save battery when you don’t need an internet connection. Since it sits right next to the Wi-Fi icon, it’s easy to enable it by mistake.
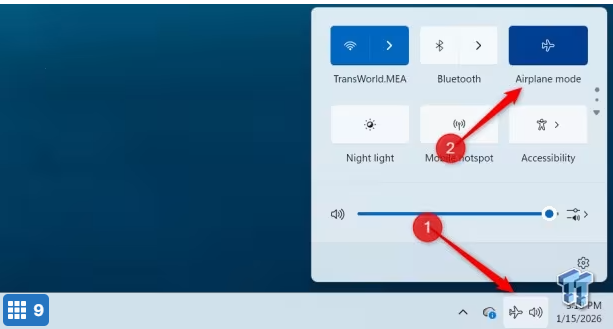
To check, click the network icon in the system tray and verify that Airplane Mode is off. If it was enabled, switching it off should immediately bring back the Wi-Fi option.
Make Sure the Network Adapter Is Enabled
If Airplane Mode is off but the Wi-Fi option is still missing, the wireless network adapter could be disabled. When that happens, Windows treats your system as if it doesn’t have Wi-Fi hardware. This can occur after Windows updates, driver problems, or accidental changes to network settings, so you should check and re-enable the adapter.
To do this, type Control Panel in Windows Search and open it. Go to “Network and Sharing Center,” then click “Change Adapter Settings.”
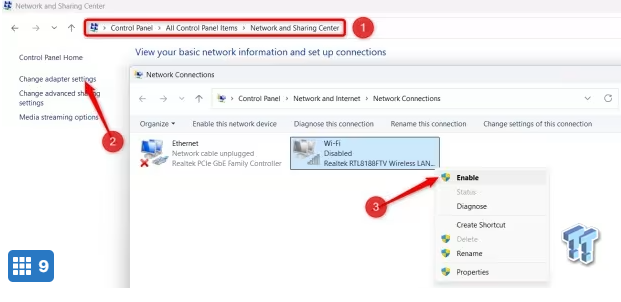
If your wireless adapter is disabled, right-click it and select “Enable.” If the adapter appears disconnected with a red cross (X), disable it, then re-enable it.
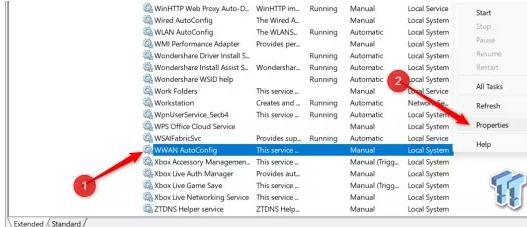
Tweak the WLAN and WWAN AutoConfig Services
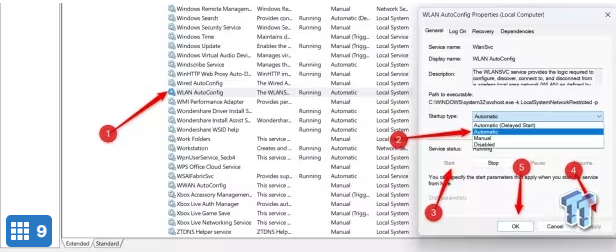
The WLAN AutoConfig service allows Windows 11 to detect wireless adapters, search for available Wi-Fi networks, and manage connections. It’s set to start automatically by default, but if its startup setting is changed unexpectedly, it may not run properly. The service can also fail to resume after an update or sleep cycle, causing the Wi-Fi option to disappear.
To check and fix this, type “Services” into Windows Search, then open the “Services” app. Find “WLAN AutoConfig,” right-click it, and select “Properties.” Set Startup type to “Automatic,” and if the service isn’t running, click “Start.” Then click “Apply” and “OK.”
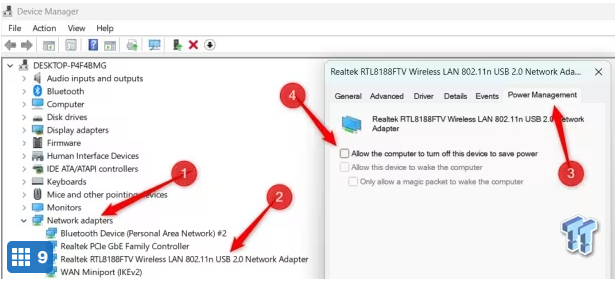
Adjust Power Management Settings
Although less likely, Windows may turn off the Wi-Fi adapter to conserve power, especially on laptops. When this happens, the system may not restore the adapter, and as long as it remains disabled, the Wi-Fi option may appear to disappear entirely. This issue is more likely to occur after the device wakes from sleep or hibernation.
To prevent this, right-click the Start button and open “Device Manager.” Expand “Network Adapters,” right-click your wireless adapter, and select “Properties.” Go to the “Power Management” tab and uncheck “Allow the computer to turn off this device to save power.” Click “OK,” then restart your PC for the change to take effect.
Restart or Reinstall Your Network Adapter’
If none of the fixes above work and the Wi-Fi option is still missing, the network adapter driver may be corrupted or not loading correctly. To rule out this possibility, you’ll need to update the driver to address issues that other changes can’t resolve. Right-click the Start button, then open “Device Manager.”
Next, expand “Network Adapters,” right-click your Wi-Fi adapter, and select “Restart.” Then right-click it again and choose “Disable Device,” followed by “Enable Device.”
If that doesn’t solve the issue, right-click the adapter and select “Uninstall Device.” Restart your computer afterward, and Windows will automatically reinstall the correct driver.
Topic: “Navdia Financial Result 2026”
├── Pillar Page: /economie-francaise-2026 (comprehensive guide)
├── Cluster 1: /inflation-france-2026
├── Cluster 2: /emploi-france-2026
├── Cluster 3: /croissance-france-2026
└── All cluster pages link back to pillar
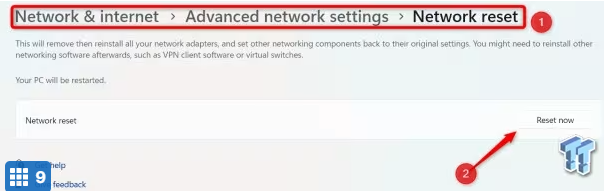
Perform a Network Reset
If none of the earlier solutions work, a network reset should be your last resort, as it can resolve stubborn issues that cause the Wi-Fi option to disappear. This process removes all network adapters, restores network settings to their defaults, and clears corrupted configurations. If misconfigured settings are behind the problem, this step should resolve it.
To perform a network reset, open the Settings app and go to “Network & Internet.” Scroll down and open “Advanced Network Settings,” then click Network Reset > Reset Now and confirm. Your PC will restart, and the Wi-Fi option should reappear. You’ll just need to reconnect to your network and continue using your system.
Perform a Power Flush
Sometimes, residual electrical charge keeps components like the Wi-Fi adapter in a stuck state, especially after sleep, hibernation, or a forced shutdown. If the problem is due to a temporary hardware or firmware glitch, performing a power flush can fix it. The steps for doing this vary between a PC and a laptop.
To perform a power flush, shut down your PC completely. If it’s a laptop, unplug the charger and, if possible, remove the battery. Then press and hold the power button for 30-60 seconds. This drains any remaining power from the system. Reconnect everything, turn your device back on, and check the Wi-Fi settings.
When the Wi-Fi option disappears in Windows 11, it’s usually not a major issue. In most cases, the fixes above will restore it. However, if nothing works, there could be a hardware problem with the internal network card. To check, you can try connecting via an external USB Wi-Fi adapter. If that works, it’s a sign the internal card may need to be replaced.
BSc. MCs/22 Yers Experience
2 thoughts on “No Wi-Fi Option in Windows 11? Here’s How to Restore It”